Drysuit Buyer's Guide
How to pick the right drysuit
First suit or fifth, the questions are the same: what material, what features, and which model fits the way you actually dive. This guide walks you through all of it.
The Basics
What is a drysuit?
A drysuit is a waterproof garment that seals water out completely, keeping you dry inside. Unlike wetsuits, drysuits use separate thermal layers underneath, so one suit covers every water temperature by swapping the undersuit.
Dry vs. wet
A wetsuit traps a thin film of water against your skin and counts on body heat to warm it. A drysuit blocks water entirely. You stay dry, and you layer thermal clothing underneath for warmth. Swap in a heavier undersuit for colder water or strip down for temperate dives -- one shell covers the full range.
Why go dry?
Longer bottom times in cold water, mostly. No neoprene compression at depth means consistent insulation and buoyancy. You also skip the post-dive chill -- step out of the suit and you are already dry. Most divers who switch do not go back.
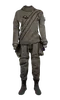
The basic anatomy
Shell, seals, zipper, valves, boots, undersuit. The shell keeps water out. Seals at the neck and wrists close the openings. A waterproof zipper gets you in and out. An inflator valve on the chest adds air for buoyancy, a dump valve on the arm lets it out. Boots cover your feet, and the undersuit underneath handles warmth.
Why custom-tailored?
A stock suit traps dead air in the folds where it does not match your body. That extra gas means extra lead on your belt and sluggish buoyancy control. A suit patterned to your measurements sits close, moves with you, and puts the seals, valves, and zips exactly where they need to be. On a three-hour deco dive, that difference matters.
The measurement process takes around 20 body measurements — we can guide you through it in person at our Hurghada location or remotely via video call. Get in touch to start.
Suit anatomy
- Shell material
The waterproof fabric forming the suit body -- trilaminate, Kevlar, or blended constructions depending on the model
- Seals
Latex, neoprene, or silicone cuffs at the neck and wrists -- the barrier between you and the water
- Waterproof zipper
Heavy-duty sealed zip across the shoulders or chest -- your entry and exit point
- Valves
Chest inflator feeds air in, arm dump valve lets it out -- together they control buoyancy and squeeze
- Boots
Integrated hard-sole boots for shore diving, or neoprene socks for a slimmer underwater profile
- Undersuit
Your warmth layer -- the shell itself has no insulation, so the undersuit does all the thermal work
Features & Materials
Understand every component
A drysuit is built from six key systems: shell material, seals, waterproof zipper, valves, boots, and an undersuit for warmth. Each can be configured to match your diving style.
Expand any term below for a plain-English explanation of what it is, how it works, and what it means for your diving.
What Your Suit is Made Of
- Trilaminate — Three layers bonded into one waterproof shell. The standard fabric for modern drysuits.
-
Three distinct layers bonded together: a nylon outer shell for UV and abrasion resistance, a PU/TPU microporous waterproof membrane rated to 20,000–50,000mm, and an antibacterial inner lining that slides over your undersuit without bunching. Same principle as a good rain jacket, scaled up for diving. Lighter and more packable than neoprene, dries in hours instead of days.
What this means for you: Most technical divers use trilaminate because it's light, flexible, and quick-drying. You wear separate thermal layers underneath, so you swap undersuits for different water temperatures instead of owning multiple drysuits.
- Fothergill 360g — Standard-weight trilaminate. Tough, packable, and the base fabric for most of the range.
-
Fothergill is a UK manufacturer of technical laminates. 360g means grams per square metre — the standard weight that sits at the sweet spot between durability and packability. It's the shell fabric for the Hydroman, Kryptonite, and Ninja.
What this means for you: 360g is tough enough for weekly diving and light enough to roll into a bag for travel. Paired with good reinforcement panels, it handles years of regular use while keeping weight and pack size minimal.
- Fothergill 500g — Heavier trilaminate for the arms and shoulders — where cave walls and wreck frames hit first.
-
Same Fothergill construction as the 360g, just thicker. The extra weight goes on the upper limbs where contact with rock, steel, and concrete is constant. More material means more abrasion resistance before the membrane is exposed.
What this means for you: Arms and shoulders take the worst beating in overhead environments. Using 500g there and lighter fabric on the torso keeps the total suit weight reasonable while protecting the zones that actually get scraped.
Used in: Medusa - Fothergill 400g — Mid-weight trilaminate for the torso — flexible enough to breathe easily on long dives.
-
Sits between the 360g standard and the heavy 500g. Used on the torso section of the Medusa, where you need flexibility for breathing and twisting but don't need the heavy abrasion resistance of the arms.
What this means for you: Your torso doesn't scrape against things the way your arms do. Lighter fabric here means easier breathing and less fatigue on three-hour dives, while your arms still get the heavier protection they need.
Used in: Medusa - Cordura 1000 — 1000-denier nylon patches on high-wear zones. Same concept as reinforced knees on work trousers.
-
Cordura is a family of tough nylon fabrics. 1000 denier means thick, heavy-duty fibres. These panels get sewn over the trilaminate on knees, seat, chest, arms, and crotch — the spots that wear through first. Think reinforced patches on work jeans, but for diving.
What this means for you: Without patches, bare trilaminate at the knees and seat would wear through within a season of regular diving. Cordura 1000 adds years to the suit's life on the zones that take the most contact.
- Kevlar / Aramid — Aramid fibre — the same material in body armour. Stops cuts and resists heavy abrasion.
-
Kevlar is the brand name for aramid fibre, a synthetic that's exceptionally strong for its weight. You'll find it in body armour, cut-resistant gloves, and racing sails. In drysuit construction, aramid replaces the standard nylon outer layer, making the fabric resistant to cuts, tears, and sustained abrasion.
What this means for you: Sharp wreck steel, rough cave rock, corroded infrastructure — Kevlar handles all of it without splitting open. The trade-off is more weight and stiffness compared to standard nylon trilaminate, which is why most suits use it selectively rather than head-to-toe. A cold-water favourite — the Ninja's hybrid construction brings Kevlar-level protection to a wider range of environments.
- Kryptonite Fabric — Our proprietary cut-resistant fabric. Approaches Kevlar-level protection at lower weight.
-
Kryptonite is Ugly Fish's own reinforcement material. It resists cuts and abrasion approaching Kevlar levels but weighs less. Applied as reinforcement panels on high-wear zones rather than covering the entire suit, so you get targeted protection where contact actually happens.
What this means for you: Close to Kevlar's cut protection without the weight or stiffness penalty. If your diving mixes sharp environments with open water, Kryptonite panels give you protection when you need it and a lighter suit when you don't. A strong performer across conditions — for the premium all-environment option, see the Ninja.
Used in: Kryptonite - Ceramic/Cordura (Ceraspace) — Cordura with microscopic ceramic particles in the weave. Abrasion resistance goes up significantly.
-
Take standard Cordura and embed thousands of microscopic ceramic particles into the fibres. Each particle acts like a tiny armour plate, spreading contact forces and resisting micro-damage from rough surfaces. Used on the upper body of the Ninja, where chest and arms scrape against cave ceilings and wreck frames.
What this means for you: Standard Cordura handles normal wear. Ceramic/Cordura handles sustained scraping against rough rock and corroded steel — the kind of contact that grinds through regular reinforcements over a season. If your upper body takes constant abrasion, this is what you want over it.
Used in: Ninja - Kevlar/Silicone — Kevlar fibres blended with silicone. Cut-resistant but flexible enough to fin properly.
-
Kevlar handles the cuts and structural strength. Silicone keeps the fabric supple so it bends with your legs. Used on the lower body of the Ninja, where your legs need to move freely for finning but still encounter sharp wreck edges, rock, and coral.
What this means for you: Pure Kevlar on the legs would restrict your fin kick. Pure Cordura wouldn't stop a sharp edge. This hybrid does both — your legs stay protected without feeling like you're finning through concrete. The silicone component also shields the Kevlar fibres from direct salt and UV exposure, and the lower-body placement means less sun contact than full-suit Kevlar — which is why the Ninja thrives across a wider range of environments.
Used in: Ninja
How the Suit Opens and Stays Sealed
- Masterseal Polymer Zipper — The waterproof zipper. If this leaks, nothing else matters.
-
Masterseal makes the industry-standard waterproof zippers for drysuits. Polymer (plastic) teeth create a watertight seal when closed. Sized from 70cm to 100cm based on your measurements. This is the single most critical component on any drysuit.
What this means for you: Everything else — the fabric, the seals, the valves — is secondary to the waterproof zipper. Masterseal has been the standard in professional drysuit manufacturing for decades because they work and they last.
- Double Zip System — Inner waterproof zip plus outer protective zip. A screen protector for your most expensive seal.
-
Two separate zippers stacked: the inner Masterseal keeps water out, the outer shields it from bumps, scrapes, debris, UV, and accidental snagging. The outer zip takes all the daily abuse so the waterproof one underneath stays undamaged.
What this means for you: Replacing a waterproof zipper is the most expensive repair on a drysuit. The outer protective zip absorbs the wear — salt crystals, gear contact, rough handling — and keeps the inner seal in factory condition far longer.
- Bronze Zipper Upgrade — Metal teeth instead of plastic. Smoother to operate and better in salt water.
-
Standard waterproof zippers use polymer teeth. The bronze upgrade swaps them for metal — better salt corrosion resistance, smoother action, and a longer service life under heavy use. Bronze has been the go-to in commercial diving for decades.
What this means for you: Saltwater divers notice the difference. Bronze runs smoother (important with cold, wet hands), resists salt buildup better, and outlasts polymer by years. It's the most popular single upgrade across the whole range.
- Zipper Placement: Back-Entry vs. Front-Entry — All Ugly Fish suits use a back-entry zipper, running across the upper back behind the shoulders.
-
A back-entry zip sits across the upper shoulders, letting you step in from behind. All Ugly Fish suits use this layout because it keeps the zip under a BCD backplate or harness, protecting it from impact, snagging, and UV exposure. Front-entry zips run across the chest or waist and are easier to self-don, but they sit exposed and can interfere with harness routing. Back-entry is the standard for technical diving.
What this means for you: If you wear a backplate and wing (most tech divers do), the harness sits right over the zip, shielding it all dive long. The trade-off: you need a buddy or a reach trick to close it. For solo shore diving, front-entry is more convenient — but for harness-based diving, back-entry wins on protection and longevity.
What Keeps Water Out at Your Neck and Wrists
- Latex Seals — Standard wrist and neck seals. Cheap to replace, effective, and field-repairable with glue.
-
Thin rubber cuffs at your wrists and neck that seal against your skin. You trim them to size from a cone shape. They're the industry default — affordable, effective, and replaceable with contact adhesive and 24 hours of curing time.
What this means for you: Latex is affordable, widely available, and easy to replace. Some divers with sensitive skin prefer silicone or neoprene for comfort. Like all rubber products, latex benefits from UV protection when stored. The low replacement cost makes latex a practical everyday choice — most divers start here and stick with it.
- Neoprene Seals — Thicker and warmer than latex. More comfortable on the neck, and no skin irritation.
-
Same material as wetsuits. Thicker than latex, provides some insulation, and doesn't trigger the skin reactions some divers get from rubber. The seal is slightly less precise than latex but more durable, and most divers find the neck far more comfortable.
What this means for you: Cold-water divers and anyone who gets irritation from latex should look at neoprene. The seals last longer, feel better on the neck, and add a small amount of warmth. The slightly looser seal is rarely an issue once you're underwater.
- Silicone Seals — Last 3-5 times longer than latex. Softer, hypoallergenic, and hold their shape for years.
-
The premium option. Softer than latex, no skin reactions, and they maintain their stretch and shape over years of heavy use. Where latex goes brittle and cracks, silicone just keeps working. They outlast latex seals by 3-5 times.
What this means for you: Frequent divers save money on replacements alone. Silicone is also the most comfortable seal material for long dives — softer against the skin and less restrictive on the neck. Higher upfront cost, lower lifetime cost.
- QCS Quick-Change Ring System — Pop a torn seal out, click a new one in. Back in the water in 60 seconds.
-
A ring mechanism permanently bonded to the suit. Seals clip in and out without adhesive, tools, or curing time. Carry a spare in your dive bag and swap a torn seal between dives — or even between tanks on the surface.
What this means for you: Without rings, a torn seal means your dive day is over and a 24-hour glue repair. With QCS, you swap the seal and keep diving. It also lets you switch between latex, neoprene, and silicone depending on conditions or preference.
How You Control Air Inside Your Suit
- Inflator Valve — Chest button connected to your tank. Push it to add air and counteract suit squeeze.
-
Mounted on the chest, connected to your tank via a low-pressure hose. Press the button to push air into the suit. You need this for two things: counteracting squeeze as water pressure compresses your suit on descent, and fine-tuning buoyancy throughout the dive.
What this means for you: Without it, your suit would crush against your body as you descend, and you'd have no buoyancy control. Simple push-button operation — one of the first skills you learn in drysuit training.
- Exhaust Valve — Left arm valve that vents expanding air on ascent. Adjustable between auto-dump and manual.
-
Sits on your left upper arm. As you ascend, air inside the suit expands (Boyle's law) and needs to go somewhere. The exhaust valve vents it in a controlled way. Set it to auto-dump (vents when you raise your arm above the valve) or manual (only vents when you press it).
What this means for you: Uncontrolled ascents cause decompression sickness. The exhaust valve is how you manage the expanding air in your suit during ascent — keeping your buoyancy under control and your ascent rate safe.
- P-Valve (Pee Valve) — Relief valve for long dives. Stay hydrated without consequences.
-
A small valve in the suit's lower body, connected to an external catheter system. Lets you urinate without flooding your suit. Available from Heser or Sitech, and installed during manufacturing for a proper watertight fit.
What this means for you: On dives past 2-3 hours, you need to drink water — and what goes in comes out. Without a P-valve, you either dehydrate (bad for decompression) or deal with the alternative. Cave divers, tech divers, and commercial divers consider it essential.
What's on Your Feet
- Integrated Boots — Hard-sole boots built into the suit legs. Walk to the water, get in, fin up. Simple.
-
Permanently attached boots with reinforced soles. Step into them when you put the suit on. They handle rocks, boat decks, and shore entries. No separate footwear to manage — suit on, walk to the water, fin up.
What this means for you: One less thing to buy, carry, and keep track of. For most recreational and technical diving, integrated boots are all you need. Slightly bulkier profile in the water compared to socks, but simpler to deal with topside.
- Neoprene Socks — Thin neoprene socks built into the suit. Slimmer underwater, rock boots available separately for shore.
-
The suit ends in thin neoprene socks instead of built-in boots. The thinner profile reduces drag and improves trim underwater. For shore entries, rock boots are available separately and worn over the socks.
What this means for you: Better hydrodynamics and cleaner trim, especially noticeable in horizontal position. If you need shore walking capability, rock boots can be purchased as an optional accessory.
How the Suit is Built
- Aquasure Seam Sealing — Polyurethane sealant hand-applied to every stitch hole. Turns seams fully waterproof.
-
Every needle pass through fabric leaves a tiny hole. Aquasure is a polyurethane sealant applied by hand to all stitched seams during manufacturing, filling those holes and creating a continuous waterproof barrier along every seam line.
What this means for you: At depth, water pressure pushes through any gap it can find. Unsealed stitch holes would weep slowly but steadily. Aquasure keeps you actually dry, not just mostly dry.
- Raglan Sleeve Cut — Diagonal seam from collar to underarm, like a baseball tee. Full shoulder rotation.
-
The sleeve seam runs diagonally from the collar to the underarm instead of sitting on the shoulder. Same principle as a baseball shirt. This lets the shoulder joint move freely in every direction without a seam restricting it at the top.
What this means for you: Reaching overhead, managing valves, clipping gear, pulling through tight spots — all of it is noticeably easier with raglan sleeves. If your diving involves sustained arm work above shoulder height, you'll feel the difference immediately.
Used in: Medusa - Dual-Zone Construction — Different materials on different body zones. Heavy where you scrape, light where you breathe.
-
Rather than one fabric across the whole suit, dual-zone construction uses heavier material on the arms and legs (constant contact with surfaces) and lighter material on the torso (needs to flex for breathing and core movement). Each zone gets the fabric that matches what it actually faces.
What this means for you: Your arms take abrasion. Your torso just needs to flex. Using one heavy fabric everywhere adds unnecessary weight and stiffness where you don't need it. Dual-zone gives you protection and comfort in the right places without compromise.
- Preformed Knees — Knees pre-shaped to a slight bend. Matches your finning position, reduces fabric stress.
-
Shaped during manufacturing to sit in the natural leg position for horizontal finning. Without this, flat-cut fabric bunches behind the knee or pulls tight in front, fighting your leg position. Preformed knees follow the bend instead of resisting it.
What this means for you: Horizontal trim for hours with no discomfort. The fabric sits naturally in your finning position instead of constantly being forced into it, which also means less crease-wear on the knee panels over time.
- Internal Suspenders — Adjustable shoulder straps inside the suit. Keeps everything in position while you gear up.
-
Adjustable straps that sit over your shoulders inside the suit and clip to the waist. They hold the suit up when you're standing on shore, keeping the neck and wrist seals in the right position and preventing the whole suit from pooling around your ankles.
What this means for you: Without them, you'd be hiking up your suit every time you bend over to pick up a tank. Suspenders keep seals positioned correctly, keep the suit comfortable topside, and mean you're not fighting gravity until you get in the water.
Thermal Insulation
- Undersuit — The insulation layer you wear inside the suit. The drysuit shell alone has no warmth.
-
A trilaminate shell keeps water out but adds zero insulation. The undersuit goes underneath and provides your warmth. Weights range from 380g (mild to cool water), 450g (cold water), to 600g (very cold). A heated option with electric elements is available for extreme conditions. Which weight you need depends on water temperature and how cold you run personally.
What this means for you: Get this wrong and you'll either be cold or carrying unnecessary weight. Too thin and you'll shiver at 30 minutes. Too thick and you'll need extra lead and lose mobility. 450g is the safe starting point for most cold-water diving — adjust from there.
Customisation & Accessories
- Colour Customisation — Pick your suit colours at no extra cost. Chest panels, stripes, stitching — your call.
-
Every standard suit includes colour customisation at no additional charge. What can be styled: overlay panels (chest panels, arm stripes), stitching and seam thread colour, and logos, names, or text sewn anywhere on the suit. What is fixed: the trilaminate base colour is determined by the fabric, and Kevlar colour is determined by the fibre. The Special model allows completely free-form colour layouts.
What this means for you: It's included in the price, so there's no reason not to make the suit yours. Match your team colours, pick something that stands out underwater, or just go with what you like. It also makes you easier to identify on a dive.
- Custom Stitching — Coloured thread on external seams instead of black. Subtle, included at no extra cost.
-
Pick a thread colour for the external seams of your suit. It's a small but noticeable detail that gives the suit a finished, personal look without adding patches or logos. Available in several colours.
What this means for you: A minor detail that makes the suit distinctly yours. It's free — just tell us what colour you want when you order.
- Name Embroidery — Your name or team ID stitched into the fabric. Permanent, clean, won't peel or fade.
-
Embroidery stitched directly into the suit fabric — name, initials, team name, or certification level. Unlike printed labels, it's permanent and looks professional after years of use.
What this means for you: When six people on your boat are wearing black drysuits, embroidery sorts out whose is whose. For teams and commercial operators, it also keeps gear management straightforward.
Head to Head
Component comparisons
Every drysuit is a collection of choices — materials, zippers, seals, boots. These tables break down the trade-offs so you can pick what fits your diving.
Shell & Reinforcement Materials
Fabric weight, cut resistance, abrasion resistance, and flexibility rated 1–5.
Zipper: Polymer vs. Bronze
The waterproof zipper is the single most critical component on any drysuit.
Seals: Latex vs. Neoprene vs. Silicone
Seals at the neck and wrists are the barrier between you and the water.
Note: All seal types are compatible with the QCS quick-change ring system, which lets you swap a torn seal in 60 seconds without glue.
Boots: Integrated vs. Neoprene Socks
What's on your feet affects shore walking, hydrodynamics, and convenience.
Temperature & Insulation
Match your undersuit to the water
A trilaminate shell has no insulation of its own — your undersuit does all the thermal work. Here's a starting point for pairing water temperature with undersuit weight.
Thin base layer or no undersuit
Most divers use a wetsuit at these temps. A drysuit works for protection on sharp wrecks or very long dives.
380g undersuit
Comfortable for most divers. A thin base layer underneath adds warmth if you run cold.
450g undersuit
The most common cold-water range. 450g is the safe starting point for the majority of divers.
600g undersuit
Ice diving territory. Layer a thin base underneath the 600g for extra insurance.
600g + heated undersuit
Under-ice and polar conditions. Active heating makes a real difference at these temperatures.
These are starting points — divers who run cold should step up one weight. You can always layer a thin base layer underneath any undersuit for extra warmth.
Find Your Match
Which suit is right for you?
Find your diving scenario below for a quick recommendation, or take the quiz further down for a personalised result.
I'm buying my first custom drysuit
You want something that works well for everything without overcomplicating the decision.
The Hydroman does everything well and nothing badly. Proven construction, balanced specs, and no features you'll need to grow into. Start here, upgrade later if your diving demands it.
I dive caves or tight spaces
Full shoulder mobility matters. You're reaching overhead, pulling through restrictions, and managing gear in confined spaces.
Ninja for cut protection in cave environments with all-condition durability. Hydroman for general cave diving — proven construction that handles overhead environments without overcomplicating things.
I penetrate wrecks with jagged metal
Sharp steel, corroded edges, and tight openings. Your suit contacts rough surfaces regularly.
The Kryptonite's cut-resistant panels handle sharp metal without full-Kevlar weight — best in cold water. The Ninja adds zone-specific protection and handles all environments including salt and heat. Both protect well without slowing you down.
I work underwater professionally
The suit gets used daily in harsh conditions. It needs to last, not look pretty.
Medusa for arm-intensive commercial work — the raglan cut gives maximum mobility. Stone for commercial environments that destroy suits — full Kevlar when nothing else survives.
I dive different environments every week
Caves on Saturday, wrecks on Sunday. You need one suit that handles the variety.
The Ninja is the go-to for varied diving — dual-zone reinforcement handles both abrasive overhead environments and sharp wreck edges, and it tolerates salt water and heat where the Kryptonite does not. The Kryptonite is lighter and more packable but best kept to cold water.
I need matching suits for my team
Matching branding, logos, and colours across multiple suits for your team or operation.
The Special is built from scratch to your design. Same logos, same colours, same layout across every suit in the order. Materials and features can vary per diver while keeping the look consistent.
I travel with my gear
The suit needs to pack into luggage. You fly to dive destinations regularly.
All three use lightweight trilaminate that rolls up and fits in a bag. The Hydroman is the lightest, the Kryptonite adds cut protection without much extra bulk, and the Medusa's dual-weight construction keeps total weight reasonable.
Side by Side
Compare all models
Five suits, each built for a different kind of diving. The Special is fully custom and not included in the comparison — learn more about it here.
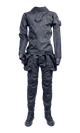

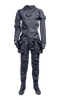
360g Fothergill trilaminate with Cordura 1000 patches. The suit the rest of the range grew out of.
Fabric Weight: 360g/m²
Zipper System: Double: polymer + protective
Reinforcement: Cordura 1000
Best for: First custom suit, general diving, technical training, cold-water recreation
Consider something else if: For heavy wreck penetration with sharp edges, the Kryptonite or Ninja add dedicated cut protection.
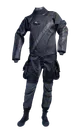
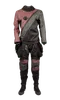
500g arms, 400g torso, raglan sleeves. Two fabric weights tuned for movement and durability where each matters.
Fabric Weight: 500g/m² arms, 400g/m² torso
Zipper System: Single: polymer + fabric cover
Reinforcement: Cordura 1000
Best for: Commercial diving, arm-intensive work, freedom of movement
Consider something else if: For sharp or abrasive environments, the Kryptonite or Ninja add reinforced cut-resistant panels.
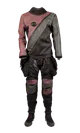
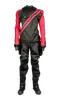
360g Fothergill base with proprietary Kryptonite cut-resistant panels. Serious protection that still packs down.
Fabric Weight: 360g/m²
Zipper System: Double: polymer + protective
Reinforcement: Kryptonite panels
Best for: Wreck penetration, mixed environments, divers who need cut protection without full-Kevlar weight
Consider something else if: For divers who want the premium all-condition option, the Ninja is the step up.
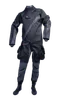
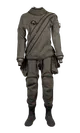
Ceramic/Cordura upper body, Kevlar/Silicone lower body. Each zone gets the reinforcement it actually needs.
Fabric Weight: 360g/m²
Zipper System: Double: polymer + protective
Reinforcement: Ceramic/Cordura upper, Kevlar/Silicone lower
Best for: Wreck and cave diving across all environments, all-condition durability with zone-matched protection
Consider something else if: If pure mobility is the priority, the Medusa moves better. If maximum protection everywhere is needed, the Stone is heavier-duty.
600g Kevlar trilaminate, every panel. Reinforcements woven into the fabric. Nothing tougher in the range.
Fabric Weight: 600g/m²
Zipper System: Single: polymer + fabric cover + zipper guard
Reinforcement: Kevlar integral (full suit)
Best for: Extreme cold-water wreck and cave diving, maximum cut/abrasion protection
Consider something else if: For warm or sunny environments, the Ninja offers a more versatile alternative. The Stone is also heavier than other models for travel.
Interactive Quiz
Find your perfect suit
Answer six quick questions and we'll recommend the best Ugly Fish model for how you dive.
Looking After Your Suit
Care & Maintenance
Rinse with fresh water after every dive, wax the zipper every 5-10 dives, and hang dry out of sunlight. Good storage and handling habits keep your suit in top condition between dives.
A well-maintained drysuit lasts years longer than a neglected one. Here's how to keep yours in top condition.
Post-Dive Rinse
After every diveRinse the entire suit inside and out with fresh water. Pay extra attention to the zipper, valves, and seals. Salt crystals left on the zipper will grind the teeth and shorten its life. Flush the inflator and exhaust valves to clear sand and salt.
Zipper Waxing
Every 5–10 divesApply the included zipper wax to the waterproof zipper teeth. Run the slider back and forth a few times to distribute it evenly. This keeps the zip smooth, prevents corrosion, and extends its lifespan significantly. Never force a dry zipper.
Seal Care
MonthlyInspect neck and wrist seals for nicks, thin spots, or tackiness. Dust latex seals with unscented talcum powder to prevent them sticking together. Keep seals out of direct sunlight and away from ozone sources (electric motors, heaters). Silicone seals need less maintenance but still benefit from inspection.
Drying & Storage
After every diveTurn the suit inside out and dry it fully before storing. Hang it on a wide hanger in a cool, ventilated space away from direct sunlight and heat. Avoid folding for extended periods — creases can damage the waterproof membrane over time. Store with the zipper open.
Annual Valve Service
Once a yearHave the inflator and exhaust valves professionally serviced annually, or more often if you dive frequently. Valves contain O-rings and springs that wear over time. A sticking inflator or a dump valve that won't seal properly is a safety issue, not just a nuisance.
Common Mistakes
OngoingDon't machine-wash your drysuit. Don't use solvents or harsh detergents. Don't store it in a hot car or attic. Don't leave it wet and folded in a dive bag for days. Don't yank the zipper when it's stiff — wax it. Most drysuit damage comes from storage and handling, not diving.
Drysuit Buying FAQ
What's the difference between a drysuit and a wetsuit?
A wetsuit lets water in and relies on your body heat to warm a thin trapped layer. A drysuit seals water out completely — you stay dry inside and wear separate thermal layers underneath. That means you can swap undersuits for different water temperatures without needing a different suit. Drysuits are the standard for cold water, long dives, and technical diving.
Do I need a 'Professional Grade' suit to dive?
No. The Professional Grade suits (Kryptonite, Ninja, Stone) are built for sharp objects, heavy abrasion, and extreme environments. If you're doing recreational cold-water diving or general tech diving, the Hydroman handles it well. Pick based on what your suit actually contacts underwater, not the category label. The Ninja is the most versatile option across all environments, while the Kryptonite and Stone are cold-water favourites. Talk to us and we'll help you decide.
Why are custom drysuits more expensive than off-the-rack?
Off-the-rack suits are cut from standard templates and assembled quickly. A custom suit starts from your measurements — every panel is cut individually, every seam placed for your body, every component chosen by you. The payoff: better fit means less excess air to manage underwater, better insulation efficiency, less fatigue, and a longer lifespan because nothing is bunching or stretching where it shouldn't be.
Can I dive in warm water with a drysuit?
You can, but most people don't. Above 24°C (75°F), you'll overheat even in a thin undersuit. Some divers still choose drysuits in warm water for protection — sharp wreck steel doesn't care about water temperature — or on very long dives where temperature drops significantly at depth.
What undersuit do I need?
450g handles most cold-water diving (10-18°C / 50-65°F). Step up to 600g for very cold water or if you feel the cold easily. 380g works for mild conditions. The heated undersuit is for extreme cold or people who run cold no matter what. You can always layer a thin base underneath any of them for extra warmth.
How do I take care of my drysuit?
Rinse with fresh water after every dive — inside and out. Dry it fully before storing. Wax the waterproof zipper regularly (wax is included). Hang the suit for storage, out of direct sunlight and heat. Avoid folding it for long periods; creases can damage the waterproof membrane. Check seals and seams periodically, and get your valves serviced annually.
What if I'm stuck between two models?
Get in touch. We've helped hundreds of divers work through this exact decision and we'll ask about your diving, your environment, and what matters most to you. We'd rather put you in the right suit than the most expensive one. Email [email protected].
Which suit is best for warm or salt water?
All Sealachi suits handle a range of conditions. The Ninja is our premium all-environment choice, and the Hydroman and Medusa are proven performers in any water. Talk to us during your consultation and we'll help match the right suit to your diving.
Still weighing it up? Talk to us.
We'll give you an honest recommendation based on how you dive, not what costs the most. No pressure, just straight answers.